Fore some time now, I have been looking for a smart and flexible way to import users into Active Directory. I know there are many scripts and suggestions out there, but none of them have suited my need (especially regarding password handling and activation).
Googled (or Binged) out, I decided to write my own post on the matter and share the simple code with you. But before I give you the code, I want to explain a few things about my setup and scenario.
For my script to work, you must either run the Powershell for Active Directory on an AD controller, or import the active directory module to your client (import-module AdctiveDirectory). You will also have to create the OU structure where you want to import your users, and possibly add the upn suffixes you want to use. To simplify my example, I am using the email address as UPN and vice versa.
Like any other way of importing, the import only gets as good as the source. Make sure your csv file is in perfect shape. I created my example csv file in Excel, and then saved it as a csv file. To save you some pain, you should open the csv file in notepad and replace any ";" with "," (as I have found import-csv to prefer , as a delimiter). When saving the csv file, save it with the UTF-8 encoding option to enable the import of special characters.
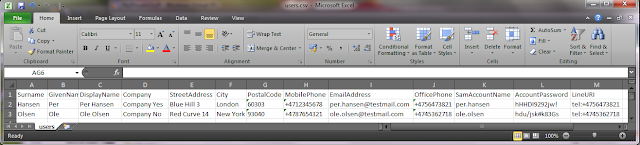
 The fields and their values looked like this in my Excel sheet.
And after I'm done in Notepad, it looked like this:

An eager eye might catch the "LineURI" field, which I will use in my next step (next post) when enabling the users for Lync Enterprise Voice as well.
And then the code:
$csvfile = read-host "file to import"
$filtertype = read-host "Field to filter import on"
$filtervalue = read-host "Value to filter"
$path = read-host "Enter OU (complete cn) for user"
Import-Csv $csvfile | Where-Object {$_.$filtertype -like $filtervalue} | foreach {new-aduser -verbose -AccountPassword(ConvertTo-SecureString -AsPlainText $_.AccountPassword -Force) -Name $_.DisplayName -Surname $_.Surname -GivenName $_.GivenName -DisplayName $_.Displayname -Company $_.Comapny -StreetAddress $_.StreetAddress -PostalCode $_.PostalCode -City $_.City -MobilePhone $_.MobilePhone -OfficePhone $_.OfficePhone -SamAccountName $_.SamAccountName -EmailAddress $_.EmailAddress -UserPrincipalName $_.EmailAddress -PasswordNeverExpires $true -CannotChangePassword $true -Enabled $true -Path $path}
Googled (or Binged) out, I decided to write my own post on the matter and share the simple code with you. But before I give you the code, I want to explain a few things about my setup and scenario.
For my script to work, you must either run the Powershell for Active Directory on an AD controller, or import the active directory module to your client (import-module AdctiveDirectory). You will also have to create the OU structure where you want to import your users, and possibly add the upn suffixes you want to use. To simplify my example, I am using the email address as UPN and vice versa.
Like any other way of importing, the import only gets as good as the source. Make sure your csv file is in perfect shape. I created my example csv file in Excel, and then saved it as a csv file. To save you some pain, you should open the csv file in notepad and replace any ";" with "," (as I have found import-csv to prefer , as a delimiter). When saving the csv file, save it with the UTF-8 encoding option to enable the import of special characters.


And after I'm done in Notepad, it looked like this:

An eager eye might catch the "LineURI" field, which I will use in my next step (next post) when enabling the users for Lync Enterprise Voice as well.
And then the code:
$csvfile = read-host "file to import"
$filtertype = read-host "Field to filter import on"
$filtervalue = read-host "Value to filter"
$path = read-host "Enter OU (complete cn) for user"
Import-Csv $csvfile | Where-Object {$_.$filtertype -like $filtervalue} | foreach {new-aduser -verbose -AccountPassword(ConvertTo-SecureString -AsPlainText $_.AccountPassword -Force) -Name $_.DisplayName -Surname $_.Surname -GivenName $_.GivenName -DisplayName $_.Displayname -Company $_.Comapny -StreetAddress $_.StreetAddress -PostalCode $_.PostalCode -City $_.City -MobilePhone $_.MobilePhone -OfficePhone $_.OfficePhone -SamAccountName $_.SamAccountName -EmailAddress $_.EmailAddress -UserPrincipalName $_.EmailAddress -PasswordNeverExpires $true -CannotChangePassword $true -Enabled $true -Path $path}
What does it do?
First I prompt for where the file is.
Then I prompt for which field to filter on, followed by what value (In my example, I would have "Company Yes" imported into one OU, and "Company No" in a different OU)
Finally, I prompt for the path of the OU I want to import users into. The format of this it: OU= ,DC= ,DC= (example OU=Yes men, DC=Comapny, DC=Com)
(Feel free to remove the "-verbose" parameter I put here to verify the creation of the accounts).
A not to those who's just reading this to get an idea on how to do this, and need to do modifications to suit your own flow of information. Anything starting with a - (like -Path) is a parameter to the command. When the value of the parameter is gathering info from the csv file it starts with $_. the followed by the column name (example -City $_.City). When calling one of the prompted values, it's looking for the parameter as it is written in the prompt (example -Path $path - case sencetive!)
The cool thing about the commands above is giving you the option to parse the csv file several times, adding users to different OU's based on different values in the csv file (Company was only an example). As the accounts are imported with passwords and they are enabled, you don't have to do anything more to start using these account.
The commands: "-PasswordNeverExpires $true -CannotChangePassword $true -Enabled $true" would not fall within best security practice, but they're here to give an example.
All of my information for this post has been gathered from these articles:
http://technet.microsoft.com/en-us/library/ee176874.aspx (using import-csv)
Comments